Thursday, March 22, 2012

Javascript - JQuery Grid – jqGrid with ASP .NET


This article explains how to use jqGrid jQuery plugin to display a Javascript grid control like in the below figure. jqGrid is an Ajax-enabled jQuery plugin to display tabular data.


For the purpose we need to reference jquery.jqGrid.min.js and jquery-1.7.1.min.js libraries and we can do this in the header section of the page as follows.

Header content

<asp:Content ID="HeaderContent" runat="server" ContentPlaceHolderID="HeadContent">
 <link rel="stylesheet" type="text/css" media="screen" href="http://ajax.aspnetcdn.com/ajax/jquery.ui/1.8.16/themes/redmond/jquery-ui.css" />
 <script src="http://ajax.microsoft.com/ajax/jquery/jquery-1.7.1.min.js" type="text/javascript"></script>
 <script src="Scripts/jquery.jqGrid.min.js" type="text/javascript"></script>
</asp:Content>


Implementation of the grid is based on storing the grid data in a hidden field as a JSON string. Therefore when a grid row is edited or deleted hidden field content will also updated with RowSaveButtonClick and RowDeleteButtonClick functions respectively. (“gridDataOrderDetials” is the hidden field)

So at the end we can read hidden field value and Deserialize it to a list of objects, in the C# code. 

Here “AddRowDatafunction works as a helper method to build JSON string in row edit and delete.

Body content

<asp:Content ID="BodyContent" runat="server" ContentPlaceHolderID="MainContent">

 <!-- Grid -->
 <table id="JqTableOrderDetails" class="JqTableOrderDetails"></table>
 <!-- HiddenField to store grid JSON data -->
 <asp:HiddenField ID="gridDataOrderDetials" runat="server" />

 <script type="text/javascript">
 // Grid data.
 var orderData = jQuery.parseJSON('[{"ShippingAddress":"Colombo 01","OrderDate":"2011-12-20","OrderId":"100"},{"ShippingAddress":"Colombo 02","OrderDate":"2012-01-15","OrderId":"101"},{"ShippingAddress":"Colombo 03","OrderDate":"2012-02-19","OrderId":"102"}] ');
 
 // Create grid.
 $(function () {
  $(".JqTableOrderDetails").jqGrid({
   datatype: 'local',
   colNames: ['Order Id', 'Order Date', 'Shipping Address', ''],
   colModel: [
     { name: 'OrderId', index: 'OrderId', width: 200, sortable: false },
     { name: 'OrderDate', index: 'OrderDate', width: 200, sortable: false, editable: true, edittype: 'text' },
     { name: 'ShippingAddress', index: 'ShippingAddress', width: 200, sortable: false, editable: true, edittype: 'text' },
     { name: 'action', index: 'action', width: 200 }
     ],
   // Add action buttons
   gridComplete: function () {
    var ids = $(".JqTableOrderDetails").jqGrid('getDataIDs');
    
    for (var i = 0; i < ids.length; i++) {
     edit = "<input id='" + ids[i] + "_Edit' type='button' value='Edit' onclick=\"RowEditButtonClick(" + ids[i] + ")\" />";
     save = "<input id='" + ids[i] + "_Save' type='button' value='Save' onclick=\"RowSaveButtonClick(" + ids[i] + ")\" />";
     erase = "<input id='" + ids[i] + "_Erase' type='button' value='Del' onclick=\"RowDeleteButtonClick(" + ids[i] + ")\" />";
     $(".JqTableOrderDetails").jqGrid('setRowData', ids[i], { action: edit + save + erase });
    }    
   },
   caption: 'Order Details'
  });

  // Load grid data.
  if (orderData != null) {
   for (var i = 0; i < orderData.length; i++) {
    $("#JqTableOrderDetails").jqGrid('addRowData', i, orderData[i], 'last', 0);
   }
  }    
 });

 function RowEditButtonClick(cellId) {
  var ret = $(".JqTableOrderDetails").jqGrid('getRowData', cellId);
  $(".JqTableOrderDetails").restoreRow(cellId);
  $(".JqTableOrderDetails").jqGrid('setRowData', cellId, { OrderId: ret.OrderId, OrderDate: ret.OrderDate, ShippingAddress: ret.ShippingAddress });
  $(".JqTableOrderDetails").editRow(cellId, false);
 }

 function RowSaveButtonClick(cellId) {
  var ret = $(".JqTableOrderDetails").jqGrid('getRowData', cellId);
  
  $(".JqTableOrderDetails").jqGrid('setRowData', cellId, { OrderId: getCellDataValue(ret.OrderId), OrderDate: getCellDataValue(ret.OrderDate), ShippingAddress: getCellDataValue(ret.ShippingAddress) });
  $('#gridDataOrderDetials').attr('value', '[' + AddRowData($(".JqTableOrderDetails").jqGrid('getRowData', cellId), cellId) + ']');
 }

 function RowDeleteButtonClick(cellId) {
  $(".JqTableOrderDetails").delRowData(cellId);
  $('#gridDataOrderDetials').attr('value', '[' + AddRowData($(".JqTableOrderDetails").jqGrid('getRowData', cellId), cellId) + ']');
 }

 var rowDataGrid = new Array();
 function AddRowData(arr, cellId) {
  var memberArr = new Array();
  memberArr[0] = 'OrderId';
  memberArr[1] = 'OrderDate';
  memberArr[2] = 'ShippingAddress';
  selectRow = JSON.stringify(arr, memberArr);
  rowDataGrid[cellId] = selectRow;
  var ids = $(".JqTableOrderDetails").jqGrid('getDataIDs');
  var outData;
  var first = true;
  for (var i = 0; i < ids.length; i++) {
   if (rowDataGrid[ids[i]] != undefined) {
    if (first) {
     outData = rowDataGrid[ids[i]];
     first = false;
    }
    else {
     outData = outData + "," + rowDataGrid[ids[i]];
    }
   }
  }
  return outData;
 } 
 
 function getCellDataValue(rowValue) {
  if ($(rowValue).val() != null) {
   return $(rowValue).val();
  }
  else {
   return rowValue;
  }
 }
 </script>
</asp:Content>

Here are few jQuery grid plugins can be found in the web.
  • Flexigrid: http://flexigrid.info/
  • jQuery Grid: http://www.trirand.com/blog/
  • Ingrid: http://reconstrukt.com/ingrid/
  • SlickGrid http://github.com/mleibman/SlickGrid
  • DataTables http://www.datatables.net/index

Tuesday, February 14, 2012

SharePoint 2010 Master Page Inheritance

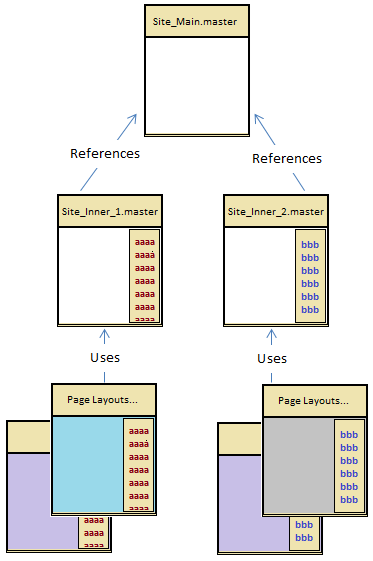
Master page inheritance is useful in SharePoint sites where we need multiple master pages with the same global layout structure. For instance a SharePoint site with all sub-sites having a unique right column for each sib-site can use master page inheritance. Here one option is to copy the entire HTML into all the master pages, but it is not a good option if we want to modify something.

Following example promotes the reuse of the right column content within a site.


Parent Master Page (Site_Main.master)Site_Main.master is the base master page and it represents the main master page area. Site_Main.master contains the header/ footer content and three Content Place Holders for main content.

<%@ Master language="C#" %>
DOCTYPE html PUBLIC "-//W3C//DTD XHTML 1.0 Strict//EN" "http://www.w3.org/TR/xhtml1/DTD/xhtml1-strict.dtd">
<%@ Import Namespace="Microsoft.SharePoint" %>
<%@ Register Tagprefix="SharePoint" Namespace="Microsoft.SharePoint.WebControls" Assembly="Microsoft.SharePoint, Version=14.0.0.0, Culture=neutral, PublicKeyToken=71e9bce111e9429c" %>
<%@ Register Tagprefix="WebPartPages" Namespace="Microsoft.SharePoint.WebPartPages" Assembly="Microsoft.SharePoint, Version=14.0.0.0, Culture=neutral, PublicKeyToken=71e9bce111e9429c" %>
<%@ Register TagPrefix="wssuc" TagName="Welcome" Src="~/_controltemplates/Welcome.ascx" %>
<%@ Register TagPrefix="wssuc" TagName="DesignModeConsole" Src="~/_controltemplates/DesignModeConsole.ascx" %>
<%@ Register TagPrefix="wssuc" TagName="MUISelector" Src="~/_controltemplates/MUISelector.ascx" %>
<%@ Register TagPrefix="PublishingNavigation" Namespace="Microsoft.SharePoint.Publishing.Navigation"
       Assembly="Microsoft.SharePoint.Publishing, Version=14.0.0.0, Culture=neutral, PublicKeyToken=71e9bce111e9429c" %>
<html id="Html1" xmlns="http://www.w3.org/1999/xhtml" lang="<%$Resources:wss,language_value %>" dir="<%$Resources:wss,multipages_direction_dir_value %>" runat="server" __expr-val-dir="ltr">
<head id="Head1" runat="server">....head>
<body>
<form id="Form1" runat="server">
.
.
.
<div>
  <asp:ContentPlaceHolder id="PlaceHolderPageTitleInTitleArea" runat="server" />        
  <asp:ContentPlaceHolder id="PlaceHolderPageDescription" runat="server"/>
  <asp:ContentPlaceHolder id="PlaceHolderMain" runat="server"/>
<div>
.
.
.
<form>
<body>
<html>

Inherited Master Page (Site_Inner_x.master)Site_Inner_x.master represents the subsite master page area for a specific subsite. Subsite specific right hand side content is populated in these master pages. Here the main thing to notice is the MasterPageFile value, which is the actual reference to the base masterpage.

<%@ Master language="C#"  MasterPageFile="~SiteCollection/_catalogs/masterpage/Site_Main.master"%>

<%@ Import Namespace="Microsoft.SharePoint" %>
<%@ Register Tagprefix="SharePointWebControls" Namespace="Microsoft.SharePoint.WebControls" Assembly="Microsoft.SharePoint, Version=12.0.0.0, Culture=neutral, PublicKeyToken=71e9bce111e9429c" %>
<%@ Register Tagprefix="WebPartPages" Namespace="Microsoft.SharePoint.WebPartPages" Assembly="Microsoft.SharePoint, Version=12.0.0.0, Culture=neutral, PublicKeyToken=71e9bce111e9429c" %>
<%@ Register Tagprefix="PublishingWebControls" Namespace="Microsoft.SharePoint.Publishing.WebControls" Assembly="Microsoft.SharePoint.Publishing, Version=12.0.0.0, Culture=neutral, PublicKeyToken=71e9bce111e9429c" %>
<%@ Register Tagprefix="PublishingNavigation" Namespace="Microsoft.SharePoint.Publishing.Navigation" Assembly="Microsoft.SharePoint.Publishing, Version=12.0.0.0, Culture=neutral, PublicKeyToken=71e9bce111e9429c" %>
<%@ Register tagprefix="WebPartPages2" namespace="Microsoft.SharePoint.WebPartPages" assembly="Microsoft.SharePoint, Version=14.0.0.0, Culture=neutral, PublicKeyToken=71e9bce111e9429c" %>

<asp:Content ID="Content1" ContentPlaceholderID="PlaceHolderMain" runat="server">
  <asp:ContentPlaceHolder id="PlaceHolderMain" runat="server"/>
  <asp:ContentPlaceHolder id="RightWebPartArea" runat="server">
    <%--Adding a webpart--%>
    <WebPartPages2:ContentEditorWebPart ID="ContentEditorWebPart2" webpart="true" runat="server" __WebPartId="{BB74483B-C04F-4C48-BDD1-3C6D5F159266}">
      <WebPart xmlns="http://schemas.microsoft.com/WebPart/v2">
        <FrameType>NoneFrameType>
        <PartImageLarge>/_layouts/images/mscontl.gifPartImageLarge>
        <ID>g_47ae1a6a_638e_4874_8a91_e9482c5f63f0ID>
        <ContentLink xmlns="http://schemas.microsoft.com/WebPart/v2/ContentEditor" />
        <Content xmlns="http://schemas.microsoft.com/WebPart/v2/ContentEditor">
          [CDATA[<div class="webpart">
           <h3>Webpart 1 Titleh3>
              <div class="webpart_content">                                                             Webpart 1 content
              div>
              div>]]>
        Content>
        <PartStorage xmlns="http://schemas.microsoft.com/WebPart/v2/ContentEditor" />
       <WebPart>
     <WebPartPages2:ContentEditorWebPart>
    <asp:ContentPlaceHolder>
<asp:Content>

<%--Adding all other place holders in the parent master--%>
<asp:Content runat="server" ID="PlaceHolderPageTitleInTitleAreaContent6" ContentPlaceHolderID="PlaceHolderPageTitleInTitleArea">
  <asp:ContentPlaceHolder id="PlaceHolderPageTitleInTitleArea" runat="server"></asp:ContentPlaceHolder>
<asp:Content>

<asp:Content runat="server" ID="PlaceHolderPageDescriptionContent2" ContentPlaceHolderID="PlaceHolderPageDescription">
  <asp:ContentPlaceHolder id="PlaceHolderPageDescription" runat="server"></asp:ContentPlaceHolder>
<asp:Content>


Page Layouts
PlaceHolderMain, PlaceHolderPageTitleInTitleArea and PlaceHolderPageDescription content areas will be overridden in page layouts. But RightWebPartArea will not be overridden in page layouts.

<%@ Page language="C#"   Inherits="Microsoft.SharePoint.Publishing.PublishingLayoutPage,Microsoft.SharePoint.Publishing,Version=12.0.0.0,Culture=neutral,PublicKeyToken=71e9bce111e9429c" %>
<%@ Register Tagprefix="SharePointWebControls" Namespace="Microsoft.SharePoint.WebControls" Assembly="Microsoft.SharePoint, Version=12.0.0.0, Culture=neutral, PublicKeyToken=71e9bce111e9429c" %>
<%@ Register Tagprefix="WebPartPages" Namespace="Microsoft.SharePoint.WebPartPages" Assembly="Microsoft.SharePoint, Version=12.0.0.0, Culture=neutral, PublicKeyToken=71e9bce111e9429c" %>
<%@ Register Tagprefix="PublishingWebControls" Namespace="Microsoft.SharePoint.Publishing.WebControls" Assembly="Microsoft.SharePoint.Publishing, Version=12.0.0.0, Culture=neutral, PublicKeyToken=71e9bce111e9429c" %>
<%@ Register Tagprefix="PublishingNavigation" Namespace="Microsoft.SharePoint.Publishing.Navigation" Assembly="Microsoft.SharePoint.Publishing, Version=12.0.0.0, Culture=neutral, PublicKeyToken=71e9bce111e9429c" %>

<asp:Content ContentPlaceHolderID="PlaceHolderPageTitleInTitleArea" runat="server">
  <SharePointWebControls:FieldValue id="PlaceHolderTitle" FieldName="Title" runat="server"/>
asp:Content>

<asp:Content ContentPlaceholderID="PlaceHolderPageDescription" runat="server">
  <SharePointWebControls:FieldValue id="PlaceHolderDescription" FieldName="Page Description" runat="server"/>
asp:Content>

<asp:Content ContentPlaceholderID="PlaceHolderMain" runat="server">
  <PublishingWebControls:editmodepanel runat="server" id="editmodepanel1">
    <SharePointWebControls:TextField FieldName="Title" id="txtPageTitle" runat="server">SharePointWebControls:TextField>
    <SharePointWebControls:NoteField FieldName="Page Description" id="txtDescription" DisplaySize="58" Text="" runat="server"/>
  PublishingWebControls:editmodepanel>

  <WebPartPages:webpartzone id="wpz1" runat="server" Visible="true"><ZoneTemplate>ZoneTemplate>WebPartPages:webpartzone>
asp:Content>

Friday, February 10, 2012

Bulk Insert to a SQL Server Table with SqlBulkCopy

System.Data.SqlClient.SqlBulkCopy class lets us efficiently bulk load a SQL Server table with a significant performance advantage over other methods. Here we can use any data source as long as the data can be loaded to a DataTable instance or read with an IDataReader instance.

How SqlBulkCopy works is it sends large batches of records to the database rather than sending one record at a time. The number of records sent by SqlBulkCopy in each batch can be set by BatchSize property, which is by default zero and send all records to be loaded in one large batch.

When we are dealing with hundreds of thousands of records it is better to use smaller batches. The optimal batch size depends on factors like network bandwidth and the amount of bytes per record. If there is an error then the entire batch is rolled back and the error would cause SqlBulkCopy to stop processing. But any batches complete before the error is committed, meaning that the database may contains some imported data.

SqlBulkCopy class can be used to data insert only.

Example: Destination Table


Create an instance of the SqlBulkCopy class and specify the DB connection and the destination table to import data.

public static void SaveBulk(DataTable dataTable)
{
  SqlConnection connection = null;
  if (dataTable != null)
  {
    try
    {
      using (connection = new SqlConnection(connectionString))
      {
        connection.Open();
        using (SqlBulkCopy bulkCopy = new SqlBulkCopy(connection))
        {
          bulkCopy.ColumnMappings.Add("AccountId", "AccountId");
          bulkCopy.ColumnMappings.Add("ProcessingDate", "ProcessingDate");
          bulkCopy.ColumnMappings.Add("Amount", "Amount");

          bulkCopy.DestinationTableName = "dbo.AccountData";

          bulkCopy.WriteToServer(dataTable);
        }
      }
    }
    catch (Exception ex)
    {
      LoggerService.HandleException(ex);
    }
  }
}

It is not a must to specify column mappings in SqlBulkCopy. If column mappings are not specified, SqlBulkCopy performs the import by mapping the first column of the source data to the first column of the destination table, and so on. It does not perform the mapping by column name. So if the column order is different or we want to do the mapping clearly, we can optionally specify column mappings indicating what columns in the source data are mapped to what columns in the destination table.

Further Performance Improvements 
 
1. Tablelock
By defaults SqlBulkCopy uses row locks during the bulk copy operation. If TableLock option in the SqlBulkCopyOptions is specified, it obtains a bulk update lock for the duration of the bulk copy operation and performance will be improved.

using (SqlBulkCopy bulkCopy = new SqlBulkCopy(connection, SqlBulkCopyOptions.TableLock, null))
{
}

2. Retrieve all data before calling WriteToServer method
In some scenarios it is possible that the import process involves steps as follows:
  1. Retrieve data from a table
  2. Loop and process retrieved data
    1. Within the loop bring additional data based on the current item
    2. At the end of the iteration bulk copy to save all processed data

In this case if we can retrieve all the data required for processing and store in a list, before start the loop (Actually before calling WriteToServer); we can expect consistent performance in the last iterations in the loop as well. Otherwise what will happen is our get queries will get queued and will take longer time to response because of the writing load on the SQL server.

A paper on SqlBulkCopy Performance Analysis, which describes how to reach top performance using the SqlBulkCopy can be found here.

Friday, December 9, 2011

Customize Blog Posts in SharePoint 2010 Blog Site Template


If you are using the out of the box SharePoint blog site and you want to customize the layout of the blog posts, this is how you do it.  This requires you to create a new XSL template file and then connect that file to the blog post.

This example shows how we remove “By” section of the blog post shown in the figure below.


1. Locate the blog.xsl file on your SharePoint server. It is located in:
          C:\Program Files\Common Files\Microsoft Shared\Web Server Extensions\14\TEMPLATE\LAYOUTS\XSL

2. Get a copy of it and rename the copy. (Ex: CustomBlog.xsl). Make sure CustomBlog.xsl is saved in the same directory as blog.xsl.

3. Modify CustomBlog.xsl. You have to find respective statement for the by line and remove it. The statement of my file was:
  <xsl:when test="@Name='Author'">
    <span class="ms-postfootercolor">
      <xsl:value-of select="$thisNode/../@resource.wss.ByPrefix"/>
    span>
    <xsl:text disable-output-escaping="yes" ddwrt:nbsp-preserve="yes">&nbsp;xsl:text>
    <xsl:value-of select="$thisNode/@Author.span" disable-output-escaping="yes" />
  xsl:when>


4. Go to the Blog home page (http://<blog>/default.aspx), then Site Actions –> Edit Page.
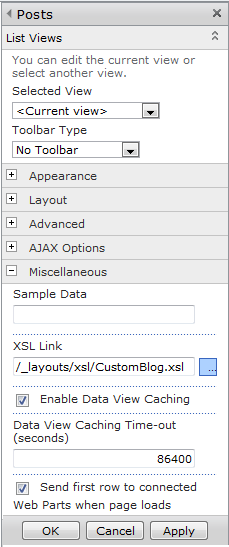
Select Edit Web Part option of the Posts Web Part.


5. Expand “Miscellaneous” section of the edit web part properties window. Specify “/_layouts/xsl/CustomBlog.xsl” as the XSL Link. Save properties.


6. Save changes and refresh the page. You will find “by” section is removed from the blog post as shown in the below figure.